Create Find/Browse Form
Login to Swift App Design Studio
Login into the App Design Studio using your Swift admin account:

Applications Control Interface
Select the Application tab from the side bar.

Click the particular application you want to create the new Find/Browse Form for. This will open up the App Designer:
Creating a Find/Browse Form

Click the
button to create a new Find/Browse Form.
Filling Up the Details
You can either opt for the Form Service or the Data Service to be rendered in the End-User app.
In case of the Form Service:

- Enter the name of the new Find/Browse Form.
- Select the underlying JD Edwards Application.
- Select the Application Version.
- Select the underlying JD Edwards Form Name
- Enter the Search Action ID (this is the control ID of the Search button on this underlying JD Edwards form)
Incase of the Data Service:

- Select either of the Tables or Business Views
- Choose the option from the Drop Down.
Find/Browse Form Designer

The features of the Find/Browse Form Designer are:
Search Criteria Designer
Select the Fields you want to add in the Search Box for this Find/Browse Form:


- Search Onload: Using this option one can control when to pull data from JDE, at the time form is loaded, or manually hitting the search button
- Close on Search: This would close the search bar after hitting the search button
- Edit Search Fields: It allows you to change the label name of the field in find and browse filters and also you can include specific fields in Search criteria.
Grid Fields

Form Fields

- Edit Search Fields: This would close or open the search bar once selected
- Match All/Any: It selects any to include filter criteria
- Control Query filters from Designer: Using the options in the “Allow Create Filters” section of the Find/Browse form’s “Search criteria” You can create new queries in the end-user Find/Browse form or push existing ones to the end-user after creating them in the designer.
- List Operators: This “list” operator can also be used in the Find/Browse form’s search criteria.

Required Field in Find Browse Form
Click on the search criteria bar of the form

Click on the gear icon, and a pop-up will appear. You can select any field which you want to make mandatory to execute the search action

There is a channel option in LOV find/browse forms where we can input data from JDE LOV.

Users can fetch data in LOV of Find Browse Form directly from JDE. Simply click on the Channel option, enter the application details and press the populate button.
You can also filter out the entries in the Find Browse form using a barcode scanner. Click on the magnifier in the end-user form and a barcode button will appear next to the search field.

Users can also use the tag to select relevant values according to their preferences. If the value is invalid, there won’t be any results and a “No record found” message will be shown.
Simply create the label fields in the search criteria, go to the control settings, and enable visibility.

Users can also add the default current date to Swift, and the Find Browse Form in any end-user application will show updated transactions till the current date.
Simply choose Settings from the gear menu, select the date control type, check the box next to the default date, then click on the Find Browse Form’s search criteria.

Users can also enable search options based on RFID tags. Simply select the RFID option from the search criteria of Find Browse Form and an RFID button will appear next to your search field in end-user form.

You can use the system filters option to find and browse information according to your preferences.

Simply click on the system filters in the app design studio’s find and browse form, then add or delete new or existing ones as per your requirements.

Pagination
Enter the number of records

Header Actions
Users can add header action in the toolbar. Each Icon directs you to the specified feature that you configure from the Swift Designer.

Simply choose as many Header Actions as you need to add in the Find Browse form. Plus, you can change the icon to match your preferences.

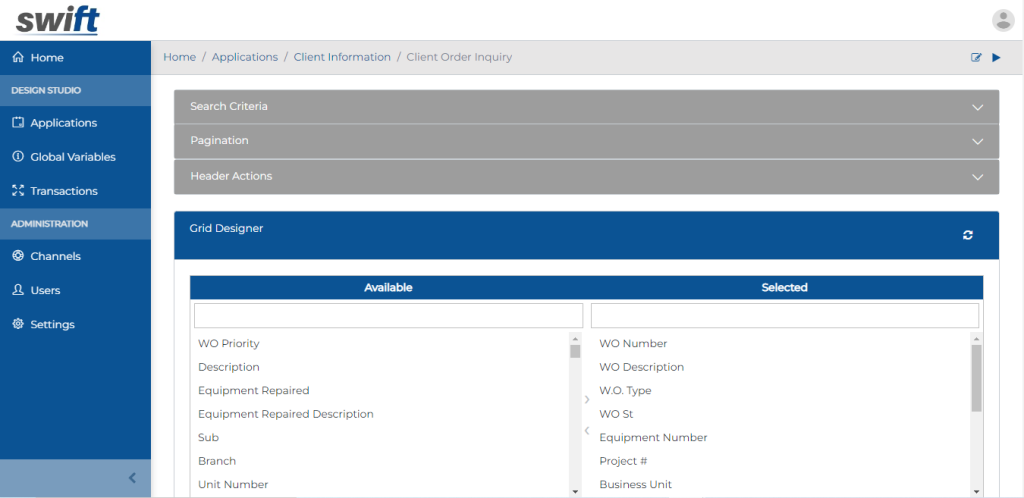
Grid Designer
Select the Fields you want to show on the grid.

Default Grid View / Card View
Users have the option of selecting a grid view or a card view as their default view.


Simply go to the app designer studio and choose the default view you want the end user app to display.

Hide / Show Grid View / Card View
Users can show either the card view or the grid view, or hide any view completely. And since you can pick card or grid view configurations easily in the app designer studio, there will be no need to do so in the end user app.

Just navigate to the app designer studio and select either or both options based on your preferences.

Card View Mapper
Select the color and type of font you want to customize your fields with in the Card view page of the end-user app

View Page Mapper
Map the Grid fields with the View/Action Form.

Map Row Actions
You can add the swipe feature to their card layout by configuring the parameters to their preference.
Once enabled, you can swipe to view and carry out row actions on the FnB form in the Card View in the end-user app.

This section works the same way as View page mapper, except, now you can open a view/ Action form even without depending on a Find/Browse column field
Save the Settings and your Find/Browse Form is now ready to be used in the End User App.
Next Steps:
